The week view
Supervise a week, relation by relation and day by day: coverage, customer versus train path times, assigning a path on a gap.
The Week view is the supervision screen of the transport plan. For a given week, it shows, relation by relation, the coverage state of each day: does the train path exist? Expanded, a row compares, point by point, the customer’s reference times with those of the train path covering each day. It is the Monday meeting screen: what runs this week, what is missing, what does not fit.
Required right Read transport plans
The screen opens from the “Week view” button of the Reference transport plan card on the dashboard, or from its address …/rail/week-view. The button passes on the period of the chosen tab: the screen opens on the current week if that period is in progress, otherwise on its first day.
Choosing the week
- The navigator
The navigator offers the current week (S) and the 8 following weeks (S+1 … S+8). The chips jump to the Monday of the targeted week; the arrows move back or forward by 7 days while keeping the chosen start day, and are disabled at the edges of the window. The title gives the ISO week number and the year of the start day, a “Current” badge on the week in progress, and the range “From … to …”.

- The start day
The date field on the left freely picks the start day of the grid, the Monday of the current week by default. Any day will do, not only a Monday: the grid then shows the 7 days from that day. The choice is bounded by the sliding window, from that Monday to the end of week S+8. With a start that is not a Monday, the active chip is that of the nearest week.
- The period, inferred
The timetable period is not chosen here: it is inferred from the displayed start day. A range straddling two periods is not handled, the period of the start day prevails. Without a matching period: “No timetable period for this week”.
The week is stored in the page address: the link can be shared, and the selection survives a refresh.
Searching and filtering
- Search and filters
The search is full text, with history and favourites; several terms are separated by commas. The filters: Departure terminal, Railway undertaking, Passing point, Origin, Destination, Axis, and Coverage. The values of Departure terminal, Origin, Destination and Axis are computed on the current period; Railway undertaking and Passing point offer all values. Search and filters apply live and are carried by the address.

- The Coverage filter
A single choice among Covered, Not covered, Over-covered, Partial (All by default). A relation is only kept if its global status over the period and its status recomputed over the displayed week both match the choice. This second status is computed on the displayed days only: Over-covered as soon as one day is a duplicate or excess capacity; Covered with no missing day; Not covered with no covered day; Partial in between. A relation absent from the week is never kept. It is recomputed at every week change, and a train with no matching relation left disappears from the grid.
Reading the grid
- The columns
The first column, frozen on horizontal scroll, carries the identity of the train and the relation; the next 7 are the days from the start day, with their date. The column of the current day is highlighted.
- The train bands
Rows are grouped by train offer, sorted by number. The band shows the train name (clickable), its origin → destination, its number of relations, and its axis on the right.

- The relation rows
Each row is a relation of the train: its departure → arrival, and on a sub-line “RU · number of points · X/7 d”. The number of points is that of the whole train’s route; “X/7 d” counts the days of the week the relation runs, excess capacity days included.
- The cells
For each relation and each day, a coloured rectangle carries the label of its status. The legend at the bottom of the grid recalls them.

| Colour | Status | What it means |
|---|---|---|
| Green | Covered | the relation is covered by exactly one train path that day |
| Red | Missing | the relation runs and no train path covers it |
| Yellow | Duplicate | several train paths cover the same day: a conflict |
| Blue | Excess capacity | one or more train paths on a day without relation |
| Hatched | Not running | the relation does not run that day |
- The discrepancy marker
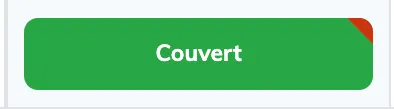
A red triangle in the corner of a cell signals that at least one train path covering that day has a discrepancy with the reference: a time (departure, arrival, intermediate) or a technical constraint. The cell is covered, but not the way the customer expects.
- The tooltip
Hovering a cell where the relation runs, Missing included: the coverage state, a summary of issues (Time issue if a departure, arrival or intermediate time of the train path differs from the reference; Technical constraints issue), and the list of train paths covering that day as
No. v.variant, absent for a missing day. On a hatched cell, the tooltip only says “Not running”.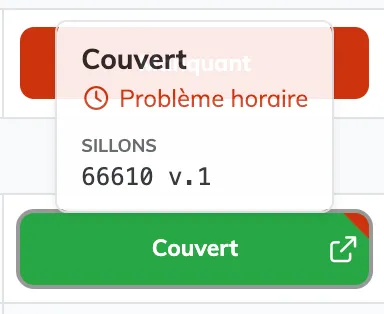
Expanding a relation
A click on a row (the chevron on the left) expands the time detail of the relation. The sub-grid repeats the 7 day columns and compares, from top to bottom, the customer’s reference (left column) with the train paths of each day.
- Technical constraints
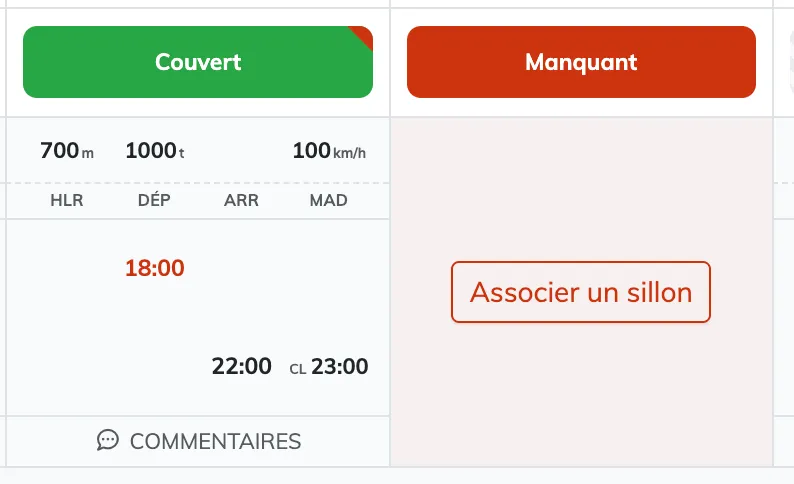
On the left, those of the train offer; in each column, those of the train path covering that day: length (m), weight (t), loading gauge, speed (km/h). A numeric value of the train path turns red when it is lower than the offer’s; the loading gauge, when it is different.

- The route timeline
Under the
HLR · DEP · ARR · MADheader, the left column lists only the points between the departure and the arrival of the relation, inclusive, one point per place (filled at the ends), with the place name and the customer reference times.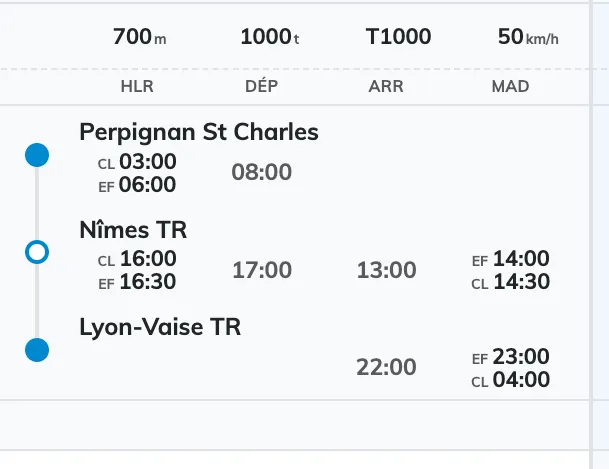
- The train path times
For each covered day, the times of the matching train path, aligned by place (matching is done on the node’s UIC code, failing that on its code). The train path’s DEP and ARR times turn red when they differ from the reference; HLR and MAD are not compared. On a duplicate, only the times of the first train path are shown. A loading indicator holds the place until the train paths are loaded, and a dash when there is nothing to show.
- The comments
At the bottom, on the left the comment(s) of the train offer, and per day the train path comment, truncated, with a tooltip to read it in full.
Reading HLR and MAD
HLR and MAD are shown on two lines, in the chronological order of the flow: for HLR, CL (customer → terminal) above and RU (terminal → RU) below; for MAD, RU (RU → terminal) above and CL (terminal → customer) below. DEP and ARR fit on one line. At the ends, the irrelevant columns are hidden: at the departure point, neither ARR nor MAD; at the arrival point, neither HLR nor DEP.
The time shown is, by default, the one without equipment constraint, otherwise the first one. A tooltip on each HLR or MAD cell lists all versions, split Customer and RU, as “time · equipment” (“No equipment” by default).
Assign a train path on a missing day
Required right Edit transport plans
- The missing day button
In an expanded relation, the column of a missing day is replaced, over the full height, by an “Assign a train path” button. It opens the link creation dialog of the reference transport plan, directly on that relation.
- After validation
The link is created, the trains are reloaded, the train paths of the affected row are removed from the cache then re-read: the cell goes from red to green without leaving the screen.
Opening the neighbouring screens
| Gesture | What it opens |
|---|---|
| Click on the train name in a band | the Reference transport plan screen on that offer: search pre-filled, offer selected, period |
| Click on a cell covered by a single train path (link icon on hover) | the Train paths screen on that train path: search, train path selected, period |
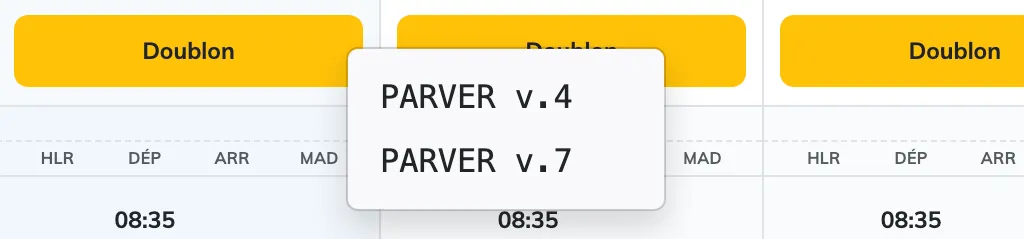
| Click on a cell with several train paths (chevron on hover) | a menu listing the train paths (No. v.variant); each entry opens the Train paths screen on the chosen train path |
- Choosing among several train paths
On a Duplicate cell, the chevron opens the list of the day’s train paths. It is the natural entry point to resolve the conflict: open each train path, decide which one to keep, and remove the other link from the transport plan.
Behaviours and performance
- Trains are loaded in a single call per period, up to 1,000 train offers sorted by number, with their coverage indexed over the whole period. The call is repeated when the search or the filters change, and after a train path assignment.
- The train paths of a row are loaded on its first expansion, once, then kept in cache; they stay valid when the week changes.
- Changing period empties the train path cache; open rows reload their up-to-date train paths by themselves.
- During a reload, the grid is greyed out and not clickable; a full-screen indicator is shown as long as no data is available. Dedicated messages cover the absence of period and the absence of results; a server error is signalled by a notification.